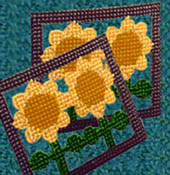
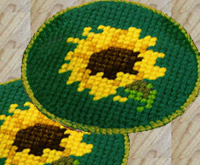
Needle work on Plastic canvas is very popular for children and craft projects, especially in situations where cutting out a shape is required. One can make many decorative things with plastic canvas like coasters, table and door mats
, rugs, box covers and more, using your imagination. As it is stiffer than ordinary canvas or cloth, it is advantageous particularly for three-dimensional objects such as boxes.
Basics
Materials Plastic Canvas: Plastic canvas comes in a variety of sizes, colors and pre-cut shapes. It comes in four sizes such as 5 mesh or count (5 holes to the inch), 7 mesh, 10 mesh and 12 mesh canvas. The mesh most commonly used in most of the patterns are the 7 mesh one, unless otherwise specified in the pattern. Canvas is available in a clear shade as well as in different colours. Unless other wise specified it is better to use the standard clear variety otherwise the colour of the mesh may be seen through the stitches of the design. It is also available in shapes like squares, rectangles and circles and the material can be stiff or soft.
Yarn & Needles : Regular worsted weight yarn is used to stitch designs on plastic canvas. It is available everywhere in a huge variety of colours and is not expensive. Big needles particularly used for this type of needle work are available.
Procedure
Counting Lines or Holes on the canvas: For working out any pattern in a plastic canvas, the canvas grid has to be counted either by its Lines also known as Threads or by its Holes also known as Squares. In some patterns the grid is counted by threads and in others by holes. It will be specified on top of the pattern. One can proceed according to specification.
The grid is counted to cut the canvas into pieces needed for the required design. Before cutting out your pieces, note the thread count or the holes count. It indicates the number of lines or holes in the width and height of the canvas pieces. It is easier to count the holes.
Marking the canvas : Outline shape with China marker or grease pencil, cut out shape, and remove markings with a dry tissue.
Cutting the canvas : Be sure to cut as close to the thread as possible without cutting into the thread. If you don't cut close enough, nubs or pickets will be left on the edge of your canvas. Be sure to cut off all nubs from the canvas before you begin to stitch, because nubs will snag the yarn and are difficult to cover.
Stitching As in any needlework, there are a number of stitches used in the plastic canvas needlework. We have explained some basic stitches used in most patterns.
When you begin stitching, don't knot the end of your yarn. Instead, begin a row by coming up from the wrong side of the canvas and leaving a small length of the yarn, i.e a 1"or 2" tail on the wrong side. Hold this tail against the canvas on the wrong side and work the first few stitches over the tail. When secure, snip the tail close to the stitched piece. Then the wrong side of the work looks neat without the knots. Always begin your work with a long piece of yarn, so that the yarn ends at the back will be minimum.
Keep your stitching tension consistent, with each stitch lying flat and even on the canvas, so that your work will be fully covered without the canvas being seen through the stitches. You shouldn't pull the yarn too hard neither should it be too loose. While stitching if the yarn gets twisted, just drop the needle and let the yarn untwist by itself.
When you end your stitches, run needle with the yarn through several stitches on the back of the stitched piece. Snip the end of the yarn close to the stitched piece.
u get many more from
here...


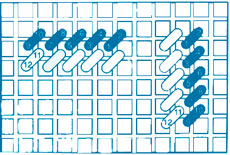 This is the basic stitch that is used on most patterns. It is used to fill the canvas. The stitch with slight variations are also known as Continental, Half cross and Basket weave stitch. Start the stitching by leaving about 1" tail of yarn on the back side and bring the threaded needle up at 1 and all odd numbers and down at 2 and all even numbers. All stitches are done in this left to right manner. This stitch is worked in horizontal or vertical rows as per instruction.
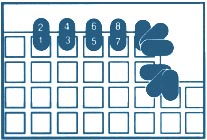 This stitch is used to finish off the unstitched edge of a project. This stitch covers the edge of the canvas and also is used to join pieces of canvas. It may be necessary to go through the same hole more than once to get an even coverage on the edge, especially at the corners. When two pieces of a pattern has to be joined, place them back to back (with the wrong sides or the right sides together). Make sure the edges being joined are even and do the overcast stitches where they should be joined.
 Scotch Stitch