Materials :
- Plastic wires (Known as 'sutali' in Kerala)
- Doll (With the Head & arms detachable)
- Crochet Needle
- Nail Brush
Procedure :
You must know Crochet to do the dress and cap of the doll. But anyone can make the fluffy flowing skirt which gives the doll its unique look.
Dress
- At first undress the doll and detach the head and arms of the doll
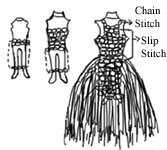
- Now put couple of chain stitches and close it with slipstitch getting a ring so that both the legs together fit into this ring comfortably.
- Now put 6 chain stitches and then one single c
 rochet on alternate chains of the ring in order to get a petal like look.
 - Now when you reach the last petal put 3 chain stitches and connect it with slip stitch onto the third chain. So that is complete.
- Continue these steps till you reach the waist line of the doll.
- Insert the doll into this.
- Now go on doing slip stitches around the doll till you reach its underarms.
- Now put slip stitches only on the chest area of the doll. Continue till you reach the neckline.
- For the strap of the dress use chain stitches
- and join it to the back side of the doll's dress.
- To give a better finish and a lacy look to the dress, stitch slip stitches around the arms and neck with a wire of contrast shade.
Skirt
 Take double the length of sutali wire depending on the length of doll's dress you want.
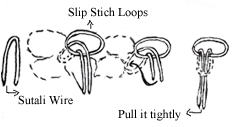
- Now fold this wire into half and tie it into the slip stitch loop's from the waist line. Method of tying the wire is shown in the figure on the right.
- Make sure you fill all the loops till the bottom to give a flared skirt.
- While you go down reduce the length of the wire to be tied so that the bottom part will be level.
- Now using a needle separate each wire into tiny strands.
- Now finally brush the skirt with the nail brush to make it more smooth and beautiful.
Cap
- Put 10 chain stitches and close it with slip stitch to get a ring.
- Then put 20 single crochet stitches into that ring and close it with slip stitch.
- On the next row put 2 single crochet into each single crocket in order to get 40 single crochet.
- Continue the above steps till you get a shape of a cap.
Note :
This craft would be easy to do if the person knows crochet.
u get many more from here...


No comments:
Post a Comment