Sweet Scarecrows
These autumn treats are so adorable and easy to assemble, they won't
scare anyone away. In fact, set out a batch, and kids are sure to flock
to them.
INGREDIENTS:
Cookies (ours were about 2 1/2 inches in diameter)
White frosting
Assorted sugar wafers (ours were about 2 1/2 inches long)
Candy corn
Mini chocolate chips
Bran cereal (we used Kellogg's All-Bran Extra Fiber)
Chocolate sprinkles
1. Frost the top of each cookie.
Step 2 2. Cut a sugar wafer in half. Add a dollop of frosting to the
top edge of the cookie and stick a wafer half to it for a hat top, as
shown.
3. Place a whole sugar wafer just below the hat top for a brim. Use a
little more frosting to decorate it with slices of candy corn or mini
chocolate chips.
4. Press pieces of bran cereal hair into the frosting around the hat.
5. For the face, press on a candy corn nose, mini chocolate chip eyes,
and a chocolate sprinkle stitched mouth.
Sunday, September 27, 2009
Solawood Flower Basket

Sola wood is a naturally obtained material. It is Tapioca peel, treated for craft purpose with which variety of things can be made. It is available in the shops where craft materials are sold. Here we are making a flower basket, a very attractive piece of art.
Materials Used

1. Sola wood - about 20 rolls
2. Thermocol - 1/2 meter
3. Hard Board -2 1/2 meters
4. Cloth - Cotton/Satin/Felt/ Velvet
5. Glue ( Fevicol)
6. Flower Making thread
7. Scissors, carbon, tracing, design, cutter
First choose the design you want to work.
1. Trace the design onto the thermocol using tracing paper and carbon paper.

3. With a thermocol cutter cut the thermocol through the outline carefully.
4. Once the cutting is over, remove all the chipped out portions.
5. Now your basket on thermocol is ready. Keep it aside.
6. Take your hard board. Cover it with the black or any dark colour cloth. Cover it properly and stretch out or bring the four sides to the back side of the hardboard and paste them to the board using glue( Fevicol).
7. Your hard board should be of appropriate size, so that your thermocol design can be properly stuck to the board.
8. Now paste the cut thermocol basket on the hardboard. Then take the sola wood. Press it slightly without pressure so as to make it smooth. Please do not press it hard, so that it becomes too flimsy. Now you have to do the 'weaving' design on the thermocol basket.

To make the Basket : Cut the sola wood into strips of even length and width say, approximately 2cm x 2cms. Each piece can be stuck on the design of the basket lengthwise and breadth wise.
Another method of making a basket : To weave the design of the basket :- Cut the sola wood into strips of even length. Paste the strips at the top edge and side of the basket and leave it loose and weave alternately. After weaving, paste the edges to the thermocol and chop excess sola wood pieces. Sides of the basket should be covered neatly with the sola wood. Now the basket is ready.
To make the Roses:- Cut the sola wood in the shape of petals. Cut the petals of 3 different sizes approximately 200 -300 in nos.
Take a small petal. Roll it and tie it at the bottom with the flower making thread. Arrange 5-7 petals around it and again tie with the thread. Now the flower is ready.
Make around 50-60 flowers of different sizes. Since the solawood is fragile, care should be taken while tying with the thread.
To make Leaf:- Carefully cut and shape 20-30 leaves with the sola wood.

First arrange the flowers and leaves on the top portion , just above the basket. Once you are satisfied with the arrangement, paste them onto the positions using glue (fevicol).
Arrangement and pasting should be done in such a manner that it should look as if the flowers are arranged from within the basket.
u get many more from here...
Wax Flowers


Fabric paint
Flower thread
Green flower
tape
Aluminium flower wire
Pips
Wax
Chart paper
Finix paper
This paper have 2 different textures on either side. It is very handy to work with - can be easily stretched, shrunk and even can be depressed to a cup like shape by using your thumb.
Method:


First draw the petals on the chart paper and cut them in different sizes. With the help of these petals cut out the original petals from the finix paper. It is always better to use the chart paper samples, to draw the outline on the finix paper and cut the petals carefully. It is stretchable and can give the desired shape of a fresh leaf or a petal. Now paint the petals with the fabric paint. The Finix paper and the fabric paint should be of the same colour. Finix paper is available in different colours, we can have our own colour choice depending upon the thing which we intent to do.

To make the flower, take a aluminum wire and tie 2 to 3 pips on the top end. The pips should be folded at the center before being tied to the aluminum wire. Take two or three small petals and keep it around the pips and tie it with the flower making thread. Arrange the larger petals around the small petals and tie it carefully with out spoiling the shape of the flower. With the green tape wrap the aluminum wire till the end neatly.
Take a big round bowl with water and let it boil. Now place a small bowl with some wax in it and let it continue boiling (double boil). When the wax melts properly, dip the flower in the wax and dry it on a news paper. Next day arrange the flowers in a beautiful vase.
u get many more from here...
Dry Reeds Arrangement- Through pix's

Materials

| Four folding a square piece of tissue paper |

Cutting the open edges in a semicircle

Placing 3 circles one above the other

Applying glue in the middle of the circles

Folding the circles around the stick or wire

The finished flower

Applying glue on the Reed

Dipping the glued reed in glitter


Applying paint on the reed

Arranging them in the brica

Placing it in the basket

Shading the white flowers with felt pens

Dry Reeds Arrangement

Dried flowers or reeds can be arranged aesthetically to brighten up your homes. The advantage of dry flower arrangement is that they'll last much longer when compared to fresh flowers. Here we have arranged the reeds in a small cane basket. Its a simple arrangement that anybody can try out and give as a gift to your dear ones.
Materials

- Dry reeds different varieties
- Glitters -Silver or any co-lour
- Fabric paint (Fevicryl) - Different co-lours
- Brush
- Face tissue
- Thin aluminum wire or stick
- Glue (Fevicol)
- Cane basket
- Oasis or Brica
Collect different reeds or grasses. Dry them in the sun.
Make small flowers
with tissue paper as shown in the picture. Cut out small equal circles from the tissue paper. OR cut out square pieces of tissue paper, four fold them. Cut the open edges in a semi circle. Open the pieces to get perfect rounds or circles. Stick two or three of them together in the center, crinkle them a bit and wrap them around a thin aluminum wire or stick. Or make any other flowers given in the paper flower section.

Co-lour the dried reeds by applying glitter or fabric paint. Take some glue in the brush and apply on the reeds. Dip the glued reeds in glitter. Apply paint, any co-lour of your choice, on the reeds with the brush. Then arrange reeds along with the paper flowers in a piece of oasis (green sponge like material) and place it inside the Cane basket. Your cane basket is ready.

u get many more from here...
Fishwire Flowers

Materials
|  |
Method

Fish wire is a broad plastic tape with thin lines on it. Take few pieces of the fish wire, of 6 inches each. From one end of each piece, leave one inch and cut along the lines without separating it, keep it aside. Take a copper wire (used for the stem) of 10 inches length. With cotton, make a small bud, cover it with the satin cloth (as shown in the picture), tie this to the top end of the wire, the center part of the flower is ready. The length of the stem can be made long or short.
Tie the 6 inch piece fish wire petals to the wire 
u get many more from here...

Poppy Flowers


- Crepe Paper (red and Golden yellow)
- Black cloth
- Cotton
- Stem Wire
- Green Tape
- Thread

- Cut red crepe paper for petals as shown in figure (4 or 5 pieces for each flower).
- Make the centre of the flower by wrapping a ball of cotton with black cloth and tying it with a thread. Attach a stem wire by twisting the wire at the bottom of the center.
- Take a strip of golden yellow crepe paper and cut its edges 1/4 " to the centre of the strip.
- Wind the strip around the flower centre and tie it with a thread as shown in the picture gallery.
- After creping (crumbling) the petals by Handkerchief method, fix petals to the centre using thread.
- Wrap the stem with green tape.


Now your flower is ready, arrange with fresh or artificial leaves

Handkerchief method
Cut the petal and fold in half lengthwise. Place it inside a handkerchief or other light material . Using the palm of one hand to hold the base of the petals, the cloth is pulled firmly away from the centre crease.

Stocking Flowers

Materials Required

Silver Wire
Thread
Green Tape
Pips -Various Colours
Scissors
Method
You can make a variety of flowers using stockings. All you need is a little imagination and creativity . So let your imagination run wild.
Petals
Take a thin wire and cut out several pieces of approximately 6" length from it. Keep it aside.
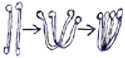
 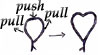 Now take one of the 6" piece wire and fold it to get an oval shape. Make it look like a heart shaped petal, by dipping the centre of the oval a bit and pulling on either sides with your hands.
Make three petals like this. Now take the stockings and pull it over the petal tightly and tie at the end using thread. Cut off the excess stocking. Cover the three petals with the stockings similarly.
Take
a thin wire and cut out several pieces of approximately 6" length from it. Keep it aside. Now take one of the 6" piece wire and fold it to get an oval shape. Make it look like a heart shaped petal, by dipping the centre of the oval a bit and pulling on either sides with your hands.Make three petals like this. Now take the stockings and pull it over the petal tightly and tie at the end using thread. Cut off the excess stocking. Cover the three petals with the stockings similarly.

Decide on the length of the stalk. Say if its about 12", cut a 24" length piece from the wire and fold it in exactly half. So that the stem will look thick. At the end of the stalk make a small bend to fix the pips.
 Take 3-4pips and fold it at the centre. Insert the pips through the bend of the wire.
 Tie it in place using thread. After this place the three petals around the pips and tie a knot again using the thread. Then wind the green tape around the stock completely. Now your flower is ready.
You can arrange these flowers in a vase.

u get many more from here...

Subscribe to:
Posts (Atom)